Mostrando entradas con la etiqueta Nail Art. Mostrar todas las entradas

domingo, 29 de septiembre de 2013

Sailor Moon Nail art 2.0

¡¡Hola a todos!! Os traigo hoy la versión mejorada de las uñas de Sailor Moon que hice en la anterior entrada =^^=

Va a ser una entrada muy rapidita, porque sólo quiero mostrar las diferencias con el anterior diseño.
Como dije cambié el color base por celeste claro con brillos. No tenía ese color como tal así que use uno celeste y otro que tengo con brillos.
Otro de los cambios es que en las uñas que no tengo el diseño de Sailor Moon me he hecho una especie de uñas francesas con esos nuevos colores.
En la mano que no se muestra va el color azul con brillo liso, tal como la otra iba en negro con brillitos.
Y sobretodo, el cambio más importante es cuando al usar un color claro en la base puedes usar el negro para definir mejor las formas =^^=
Además que con un poco de más maña y paciencia se puede hacer un dibujo un poco mejor, claro.

Os dejo las fotos para que veáis de lo que hablo =^^= Nos leemos pronto!!


HI everyone!! Today i will show you the new and better version of my nail art of Sailor Moon =^^= (that i did in the last entry)

This will be a quick entry because i want to show them and that is all hehe. Thanks to the photos you could see clearly the differences.
Like i said i used another base colour, the blue one with sparkles it is perfect. In the nails i don´t have the design of  sailor moon i did them like the french manicure and it is pretty cute like that.
In the other hand, the hand you can´t see i use the blue with sparkles color and that is all, like in the other design those nails were plain black, but now they are blue with shine.
And the most important thing is that thanks to the blue color i could use black to do a better design.

So now i let you see the photos =^^= Read you soon!!


domingo, 22 de septiembre de 2013

NAIL ART: SAILOR MOON

Hola a todos!! Les habla Hiromi =^^=
Vamos a tratar de ir retomando la actividad del blog más a su ritmo normal, es que volver de las vacaciones y todas las cosas que hay que hacer en septiembre no han ayudado mucho, pero bueno, vamos a ponernos a ello.

Hi everybody!! This is Hiromi =^^=
I know about the lack of the entries, but you know that when you come back home after hollidays there are a time that you have to do a lof ot things and... ok ok i really try to update de blog more often like before!!

Hoy vengo a traeros un tutorial de nail art que he hecho para una amiga que me enseñó unas uñas monísimas!!
Pero antes de empezar quiero hacer ciertas precisiones importantes, de hecho quiero volver a hacerme estas uñas teniendo en cuenta estos primeros consejos que os voy a dar:

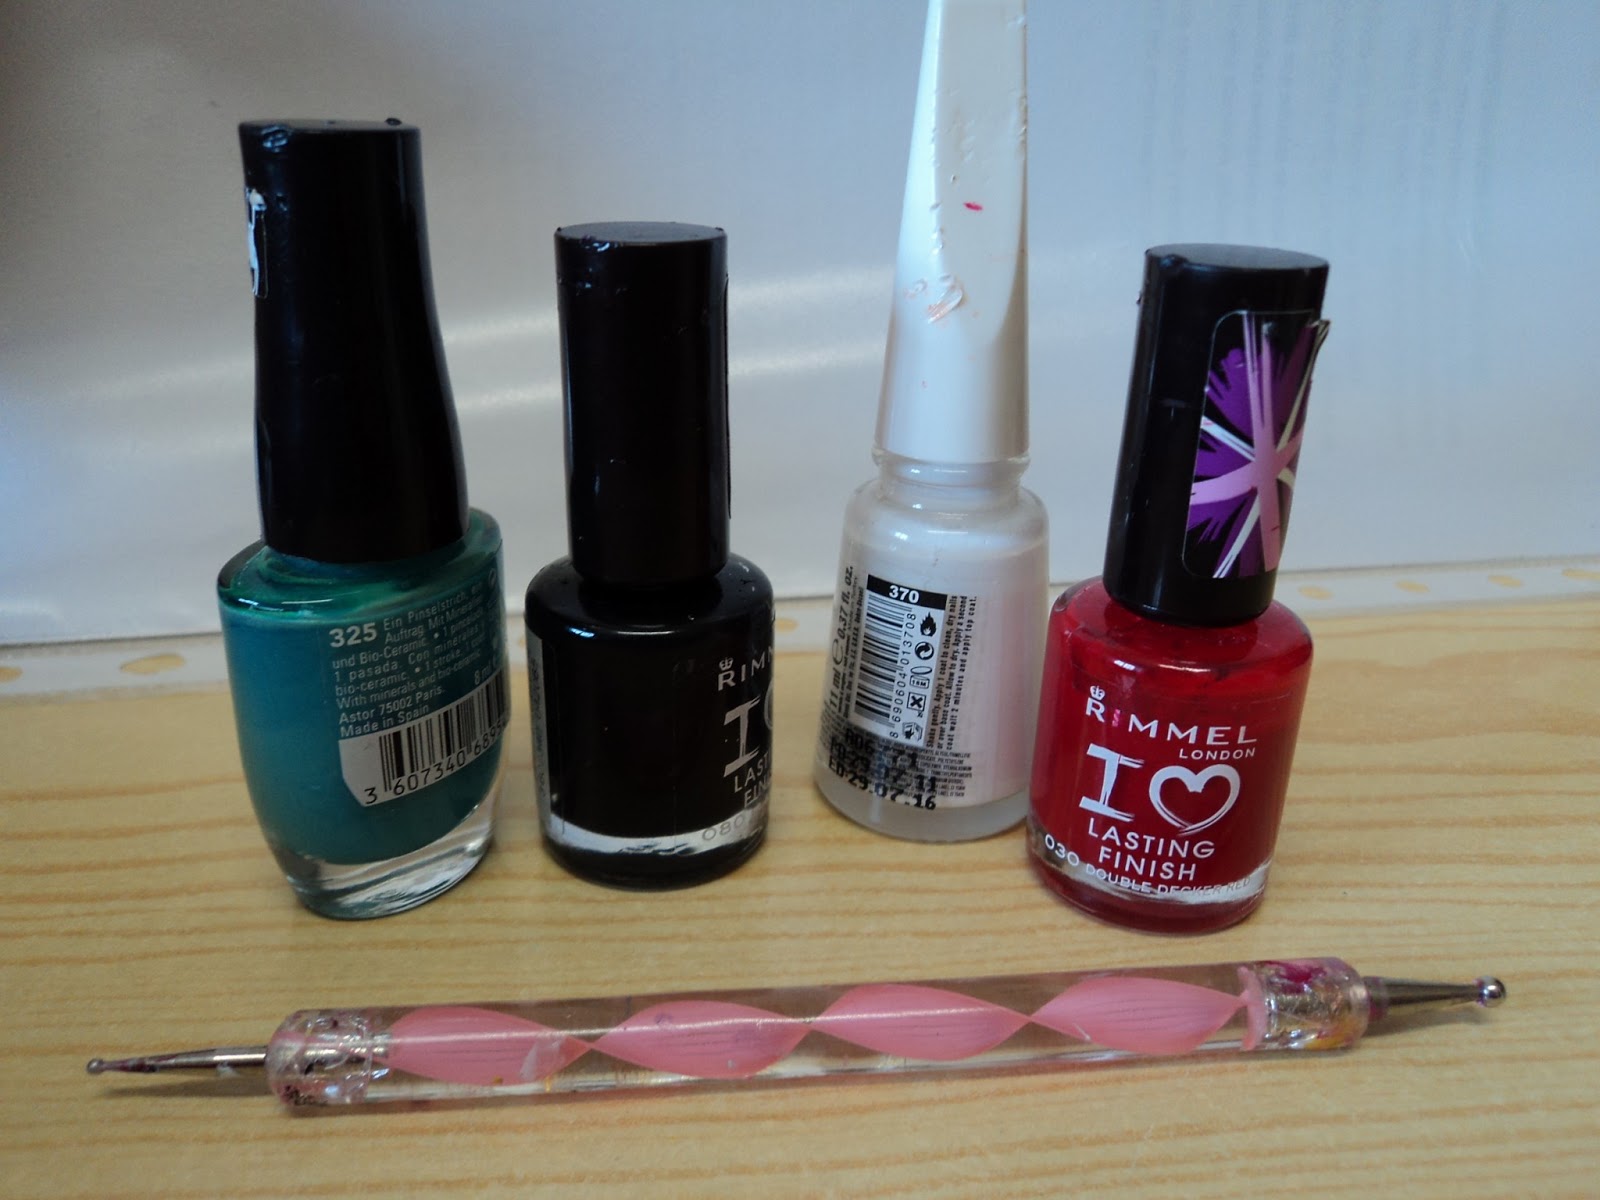
* Buscar piedrecitas de colores MUY pequeñas, las más pequeñas que podáis. En la imagen de referencia que me dieron la uña era bastante grande y cabían muchas, pero no todas tenemos unas uñas enormes!! Así que si queréis que sea recargado el resultado necesitáis buscar piedrecitas muy pequeñas o poner menos, claro. 
*En el primer resultado que os voy a mostrar y en la imagen que use de referencia el color base es el negro, pero la verdad es que yo os recomendaría otro color, por ejemplo un azul con purpurina o algo semejante. ¿Por qué? Pues como ya os explicaré, hay partes en la que debes delimitar la forma o hacer detalles con el negro y con ese fondo se confunde y no ayuda tanto al resultado deseado como podríamos pensar. Se difuminan los detalles.
* El color dorado es importante en este diseño así que haceros con un buen color, y si vuestro dorado, como me pasó a mí no es muy cubriente os contaré el truco para que quede bien: primero haces la forma en blanco y sobre una base blanca pintas el dorado, de manera que podrá verse como se debe sin problemas (aunque es más tedioso, claro)
*Usar un pincel de punta muy fina y con paciencia y tranquilidad hacer las forma.


Today i am going to show you a nail art tutorial of Sailor Moon that a friend told me if i could do it, the nails are sooo cute!!
But, before to explain how i did them i want to do some precitions about of them, because when i did tjem i saw that i could do better some parts and re-do others so you can see a better desing. So those are my advices:
* First of all, search for a super lil stones so you can put in the design all you can. If the stones are bigger you won´t put a lot because of the size of your nails. It is obvious that if you do this design in false nails you could do them better becasue of he size of them.
* In my photos you can see that the background of the details and the color base is black, but i recomend you to use another colour. Why? because you will use the black colour to re-define some parts of the design and with that colour in the background it is difficult to see the good results. So i tell you to use another colour that you think that will be nice in a Sailor Moon design.
*You will need a good gold colour, because the design need it, so buy a good one. If you don´t have a good one (like me) you can do first a base in white colour and then paint the gold in it, so you could see the gold design better thanks to that. But it is a pain of course to have to do it twice -_-
*Use a fine brush for the precition of the details and the draw.

Y ahora vamos al lío!!

And now here we go!!


SAILOR MOON NAIL ART TUTORIAL

(Siento la calidad de las fotos, era de noche y la luz era muy mala, lo digo ya por anticipado ^^U
I tell ya now that i am sorry for the quality of the photos, it was late at night and the light wasn´t good ^^U

Protege tus uñas con una capa base y aplica en tus manos el color base elegido, yo he usado un negro con brillantina, pero como he mencionado antes lo mejor es cambiar de color base para que luego los dibujos puedan tener más detalle.

Use a base coat to protect your nail and then use the base colour you had choose. I use the black one but like i said i recomend you to use another colour so you can use the balck in the details.


**Yo soy de las que me pinto todas las uñas y luego uso un bastoncillo con acetona para quitarme los restos, así que no os extrañéis que me salga cuando enseño el proceso, los detalles asi los dejo para el final.
**If you see that i didn´t do a perfect paint in my nails that is because at the end i use acetone to erase de imperfections in the nails, so don´t surprise for it hehe


Para el diseño del dedo gordo. Usa el color base del rosa para que el dorado pinte mejor y con cuidado usar este color para hacer la estrella con el pincel fino. Añade las piedrecitas al gusto. (yo os recomiendo que delimitéis la estrella con color negro, no lo hice pero luego pensé que sería mejor). Recordar que cuando esté mojado el dorado es el momento de poner las piedrecitas y una vez seco aplicar por encima la capa top coat para que no se muevan.

For the design of the big toe: I use the base color of pink so i could paint then better the gold one in it, for the star you have to do, use the fine brush like i told ya. Add the  stones you can or you have, remember that the litter they are the more you can put. I recomend you to use the fine brush to do the details of the star, i didn´t do it and then i thought that i could do it, so you can do better than i did the first time.  Remember that the perfect time to put the stones is when the paint isn´t dry, and then when it will be dry we will use a top coat.


Para el diseño del dedo anular use de base el color rosado, pero luego descubrí que era mejor el blanco, por eso os lo he recomendado en las instrucciones previas directamente. Aquí tener cuidado con el tamaño en el que pintáis los detalles porque hay muchas cosillas que hacer en una uña que no suele ser muy grande (a  menos que tengáis las uñas super largas que en ese caso ¡¡adelante!!) De nuevo usar el pincel fino y con paciencia. El truco de las piedrecitas es igual a lo anterior.

For the design of the ring finger, i used the base of pink again, but then I discovered that it was better to use the white one, so i recommend you to use that color. Here you have to be careful with the size of the design because you can put a lot of details but you don´t have a lot of space, so try to do things very lil and with care, but if you have big nails or you are doing it in a false nails of course you could put more details than in your own nails. You only have to use the brush and have patience. You have to put the stones like in the other toe.


Para el diseño del dedo corazón usé además que tenía piedrecita de forma de luna y encima rosa  para que quedara mejor ya que yo no podía poner muchas piedrecitas por el tamaño de mi uña. Cuidado con las alitas, es la parte más fastidiosa y yo aún tengo que mejorarlas, quería ponerle al menos tres plumas pero el espacio… 

For the design of the middle finger I used a super cute moon stone i had that was perfect for the design. I could not put many stones because of the size of my fingernail but i think the moon give it a cool design. Watch the wings, is the most annoying part and I still have to improve them, I wanted to put at least three feather but i couldn´t... ok, in the next future i will do better...


Bueno, así que al final este es el resultado!! Espero que os guste y que os sirva. Espero hacerle modificaciones a este diseño y mejorarlo con los consejos que ya os he dado, para entonces os daré si queréis un nuevo tutorial!! pero mientras tanto espero que os haya gustado este!!
Nos leemos pronto!!

So at the end this is the result!! I wish you like it and it will help you. In the next future i will re-do them and do them better, so i will do another tutorial if you really want them, but for now you have this!!
Read you soon!!


lunes, 16 de septiembre de 2013

Nail Art. Basics

Hola a todos!! Aquí Hiromi una vez más =^^=

Hi everybody!! This is Hiromi one more time =^^=

Como veo que a muchas os empieza a interesar el tema del nail art, esta afición tan entretenida, pues he pensado en explicaros un poco las cosas básicas del cuidado de uñas como hice con el post del cabello y hablar de las cosas básicas que tenéis que tener y saber.

Entrada acerca del cuidado capilar:
http://cuteanddarkgeekylife.blogspot.com.es/2013/03/geek-beauty-hair-care.html

Así pues vamos a empezar con los básicos!

I saw that a lot of you really like my tutorials of nail art and think about how to do it yourself and how much you have to know to can do it well, so i am thinking to do this blogentry to show you the basics of the nail art and nail care, like i i did with the entry about hair care:
http://cuteanddarkgeekylife.blogspot.com.es/2013/03/geek-beauty-hair-care.html

So... here we go!!

NAIL CARE: BASICS


1. Protector de las uñas.
Si vais a empezar a pintaros las uñas y queréis cuidarlas lo primero que os recomiendo es comprar una laca de uñas que sea de base translúcida y que proteja, cuide y le de vitaminas a la uña.
Podéis comprarlas en cualquier tienda donde vendan pinta uñas (en el Mercadona los hay), pero si sois habituales de ebay os recomiendo los de la marca "SkinFood" que es coreana y es muy buena, si podéis pillar alguna oferta, os va a compensar, pues ayuda mucho al crecimiento y cuidado y protege vuestras uñas mientras estén pintadas.
Antes de pintaros las uñas aplicar siempre este protector.

1. Base coat
The first thing you have to know if you want to begin to paint your nails regulary is that´s you need a good base coat to protect your nails. The base coat is very important if you want to have a heathy nails!!
You can buy a lot of different types of them but i recomend you to buy one with vitamins. Remember that a good base coat is super important so buy one a bit more expensive that you would buy always thinking in the health of your nails.
A "expensive" one haven´t to be a super expensive one, for example, in ebay you can buy one of the brand "Skin Food" for more less 5 $ i think i remeber.
Like i said, you can buy if you want a cheaper colour but the base have to be good because you can damage your nails.


SKINFOOD Nail Vita Base Coat
Esta es mi base de uñas.
This is my base coat


2. Colores.
Yo soy la primera que siempre que ve colores de uñas se tira a los de siempre, los negros, los rosas, los rojos... Pero para hacer toda clase de tonterías en las uñas es bueno que tengáis un poco de todo. Por ejemplo, a mi no me gusta el color amarillo ni el verde, pero aún así tengo de varias tonalidades para lo que necesite, nunca se sabe cuando vas a necesitar el verde para algo floral o un amarillo para un packman =^^=
Otra cosa importante es que, cuando empecéis a compraros pintauñas, pensad que mientras más tonalidades dentro del color tengáis más cosas podréis hacer, sobretodo cuando el dibujo que hagáis conste de un mismo color en varias tonalidades.
Así pues yo soy la que tiene veinte millones de rosas, por ejemplo jajaja

2. Colours.
I am the first that love to have million colours in my collection but i don´t know why i always buy the same types hahaha i think that is because i love pastel colours, violets, pinks... BUT if you want to do nail art you have to have a lot of different types, so altought you can´t like some colours (for example i don´t like green or orange) you may have some of them for the draws you want to do. In the future you don´t know how many colours you will need to do the things you can imagine, so it is better to have a lot of them not only the colours you like the most.
I tell ya that the best it is to have differents tonalities not only of the different colours, i mean in the same colour too, for example different kinds of pinks.


3. Lacas de uñas.
Esto que os voy a contar es desde un punto de vista un poco más personal incluso, pero llevo muchos años, más de diez, pintándome las uñas, y creo que ya tengo algo de solidez en mis opiniones.
Los pintauñas de los chinos esta muy bien para poder tener mil colores pronto, para poder hacer detalles, pero mi recomendación es que los colores que uséis de base, los que pinten toda vuestra uña y estén en contacto con vuestra piel sean buenos.
Eso no implica que tengáis que gastaros 10 euros en una laca de uñas, no, pero los hay por tres euros, de marcas como Astor, que no tienen zinc y que no irritan la piel ni las cutículas.
A mi me han descubierto una alergia cutánea al zinc, que tienen algunos pintauñas y tengo que tener cuidado con ello, pero eso me ha hecho darme cuenta que una cosa es pintarte las uñas de manera esporádica con un pintauñas malo y otra hacerlo algo habitual. Yo que tengo alergia me doy cuenta de los efectos que tiene más rápido que los demás, pero sigue sin ser bueno para quien no tenga esa alergia fuerte.
Así pues, usar la laca más malilla para pintar detalles sobre la laca buena, por ejemplo flores o los motivos que sean, y dejar la laca de uñas más buena para las bases.

4. Nail polish
This is my point of view, ok? I paint my nails for a long time now, more than 10 years, so all of this is on my own experience. So, you can really like to have billion nails polish and you can think that the cheapest is the better because you can have much more... BUT that isn´t true -__-
Because i used in the past too much "not too good" (or super cheap) nail polish now i dicovered that i had a skin allergy to those kind of products. So, please, take care of your skin too and buy good ones. I am not talking to buy the super expensive ones like chanel or brands like that, but there are a lot of good brands who really care of your skin. Try to think that it doesn´t matter if they are cheap if in the next future you won´t paint again your nails because your skin is damage!!
Zinc is the responsable of that kind of allergy so take care if the nail polish have zinc and try to buy the better ones. There are a lot of good brands that you can buy in the supermarket or in a lot of places, like internet too.
And if you have those cheap ones and you don´t want to throw them away now you can use it for the details of the nail art not in the base of the nail, so you will save your nail and skin.


Misha es una buena marca calidad-precio
Misha is a good brand


4. Quitaesmalte.
Si podéis usarlo sin acetona, mejor, la acetona es muy corrosiva, y si os pintáis las uñas mucho esto os terminará irritando, al quitároslo. No vais a notar la diferencia vosotras pero vuestra piel si, así que no cuesta nada y es un buen consejo.

4. Nail polish remover.
Not only a good nail polish is important to keep safe your skin a good remover is too. So if you can try to use without acetone, there are nail polish remover with and withouth it.


5. Cuidado de las cutículas.
Las cutículas son MUY importantes en la salud de vuestras uñas, son las que hacen que crezcan sanas y las que nos muestran la salud de estas. Así que hay que cuidarlas, os voy a dar unos consejos:
-No retirarlas con cortacutículas si podéis evitarlo, estas sirven de engrase natural de las uñas.
-No las empujéis hacia dentro demasiado con los aparatos para esto. Como lo anterior, si no os molestan, dejarlas tranquilas XD
-Si la cutícula es muy grande y molesta podéis recortarla, no es que pase nada malo por hacerlo de vez en cuando, pero no os obsesionéis con no tenerlas porque os vais a herir los dedos
Y recordar que si las tenéis dañadas en el mercado hay muy buenos productos para repararlas, sólo necesitáis paciencia, pero si no tenéis dinero para comprar algún producto recordar que hay muchos remedios caseros muy buenos. Yo siempre recomiendo, para las cutículas, un poco de aceite mezclado con jugo de limón exprimido, aplicarlo todos los días en masaje circular hasta su absorción. Ya veréis cómo se os recuperan!!


5. Take care of your cuticles.
The cuticles are very important in the health of your nails, they are what make them grow healthy and show us the health of these. So you have to look after them, I'll give you some tips:
-Do not remove with clippers, these natural lubrication serve nails.
-Do not push them a lot with the appliances for the cuticles. If they don´t bother you, leave them alone XD
-If the cuticle is very large and annoying you can cut them a bit, it is not bad if you don´t do it super often, but don´t get obssed with not having them because you are going to hurt your fingers.
And remember that if you have them damaged, in the market are very good products for repair them, you just need patience, but if you have no money to buy any product remember that there are many home remedies very good. I always recommend to the cuticles, a little oil mixed with squeezed lemon juice, apply it daily in circular massage until completely absorbed. You'll see how you recover!


Espero que os haya resultado útil estos consejos básicos, a partir de ahora estos serán los cimientos para vuestra aventura en el nail art =^^= Y recordar siempre que ahorrarnos pasos se traduce siempre al final en estropearnos la piel y las manos, no compensa!! No seáis perezosas y hacer estas cosas mínimas que con paciencia os darán muchos frutos =^^=

Nos leemos pronto!!


I hope you find this basics tips helpful, from now on these will be the foundation for your adventure in the nail art = ^ ^ = And always remember that sometimes to save steps always end resulting in damage in your nails and skin so don´t do it because it isn´t worth it!! Don´t be lazy and do these things with a minimum patience you will see big results = ^ ^ =

Read you soon!

lunes, 1 de julio de 2013

Nail art!! Justice League

Hola a todos!!! Hiromi al habla =^^=
Hoy os traigo el ansiado tutorial de la Liga de la Justicia!!! =^^=
Ya avisé que quería hacerme estas uñas desde hacía tiempo pero no había podido y por fin he tenido tiempo!! Así que vengo a compartirlo aquí =^^=
¡¡Espero que lo intentéis y me contéis cómo os ha ido!!


Hi everybody!! This is Hiromi =^^=
I told you for a long time that i wanted to do this type of nails but i didn´t have a lot of free time, but i could do it!! The last weekend i could do it so now i want to show you how to do them and if you try them i wish you can show me too =^^=
I hope you like them!!

NAIL ART! JUSTICE LEAGUE


Advertencia!! **Estas uñas son de dificultad media-alta, sobretodo por los cambios de colores y los símbolos que requieren un poco más de maña y paciencia. Así pues recomiendo que hagáis las caritas en vuestra mano buena, pues son más sencillas de hacer con la mano torpe y los símbolos en la mano torpe con la mano con la que se os de mejor pintar =^^=

Advert! ** This nails are normal-difficult ones, because the lot of colours and the time you are going to use, so i recomend you to have patiente. And i recomend you to do the simbols with the good hand in the bad one and the faces with the bad hand in the good one because the faces are easier than the symbols.


PASO 1.
Pintamos las uñas de color carne para hacer los rostros de nuestros cinco elegidos de la Liga de la Justicia.
Darle un par de capas para que el color carne cubra bien vuestra uñas.

STEP 1.
Use the flesh colour to paint your nails, put two layers because the flesh colour isn´t so dark, so you can paint the faces better in them.


PASO DOS: COLORES
Además de los señalados en la foto de abajo vais a necesitar blanco y amarillo

STEP 2. COLOURS.
You will need the colours in the photos plus yellow and white.

Usar estos colores para hacer las bases en donde irán los símbolos de los super héroes

Use those colour to to the base for the symbols of our superheroes


PASO 3.
Usa el negro para hacer los cabellos de los superhéroes y la máscara de Batman, así como las bocas que quieras pintar.
Usa el rojo para hacer la capucha de Flash.
Para este paso os recomiendo que useis un pincel fino para pintar en las uñas. Los pinceles se pueden comprar fácilmente en los chinos, no hay pérdida.
El pincel os va a facilitar controlar la pintura para hacer las formas que queráis, además, aunque estés usándolo con la mano mala con paciencia no te salen malos resultados.

STEP 3
Use the black one to do the hairs of the superheroes and the Batman mask, and the mouths you want to paint too.
Use the red colour to do the Flash mask.
I recomend you to use a nail brush to do that, the nail brush is very easy to find in stores or in ebay and it is super useful to do this kind of draws in your nails and are easy to use too, so with patiente you can do them


PASO 4 Empezamos con los Símbolos.
Para hacer los símbolos, muchos de ellos además de estar sobre un fondo de un color están dentro de un círculo blanco, o alguna forma. Así pues es lo primero que haremos.
Primero, con la ayuda del marblelizador, que siempre usamos en los tutoriales, haremos dos círculos para los símbolos que estén en ellos.
Y con el pincel haremos el resto de símbolos, sin prisa, con tranquilidad.


STEP 4. Beggining with the symbols.
We will use to do the base of the symbols the marblelizing pen we usually use in all the nails arts i put here in my blog.
First we will do the circle with them and the other forms we will do them with the brush. Don´t worry and do them with calm, they aren´t as difficult as you can think in the beggining.


PASO 5. Vamos con las caritas!!
Hacer las caritas es MUY sencillo, sólo necesitas el lapiz marblelizador, mojado en su punta más pequeña en blanco o negro para hacer los ojos.
El antifaz de linterna verde lo haremos con el pincel, despacito y de lado a lado y veréis que bien os queda.

SPET 5. Lil faces!!
Like i show in other tutorials, use the marblelizing pen to do the eyes with the tiniest part, it is easy! You only hat to do dots with it!
The mask of Green lanters you have to do it with the brush, do it with calm and you can do it easyly too.


PASO 6. Símbolos.
Ahora viene la parte "complicada" y lo digo entre comillas porque como estamos haciendo los símbolos con nuestra mejor mano el pulso no debería temblarnos demasiado, y como además los símbolos no son muy complicados, sólo tenemos que tener la referencia delante para hacerlo.
Usar para ello el pincel.


STEP 6. Symbols.
Now you have to do the "difficult" part, i say that with "" because you are using the best hadn you have and the symbols aren´t so difficults in their forms, so take care, see the symbols in a reference and draw them with the brush


PASO 7. Detalles.
Ahora terminamos los ojos o lo que se nos haya quedado atrás mientras esperábamos que se nos secara la pintura, como la tiara de Wonder Woman o le ponemos la boca, que se me había olvidado a Flash, este estará contento, no como Batman que parece hastiado como si dijera "¿Qué hace un héroe oscuro como yo entre todos estos metecatos luminosos???" XDD


STEP 7. Details.
Now it is the time to do the things you couldn´t because of the wet paint, like the tiara of Wonder Woman or letting Flash to have a mouth haha i forgot that haha I put a quite shy smile, not like Batman, his face is so funny like he was thinking "Gosh, why i have to be with thos baddass?" hahahaha


PASO FINAL.
Como siempre aplicamos la capa final translúcida y adherente para un resultado final mejor =^^= Et voilá!!


LAST STEP.
We use the top shinny coat to have them finished!! =^^= Voilá!


domingo, 16 de junio de 2013

Disney Princess

Hola a todos!! Aquí Hiromi =^^=

Hi everyone! This is Hiromi =^^=

Os hoy traigo una entrada muy rapidilla... (¡¡que raro en mí!! XD)
Veréis, es que me hice este fin de semana unas uñas monísimas, son de complicación media (más que nada por tener que usar un pincel) pero vamos que no son hipercomplejas, aún así no estaba segura de si querríais tutorial, y como se me fue el santo al cielo no hice fotos del proceso.... -_-U

Por lo tanto vengo en esta entrada para enseñároslas y deciros que si queréis tutorial, pues yo lo hago sin problemas =^^=

Las estrené el sábado que hizo un calor en Sevilla HORRIBLE y estrené de paso un vestido largo muy mono que me compré y un look más colorido (normalmente uso sombras de ojos de colores tierras) y me puse mis lentillas turquesas de UNIQSO (http://www.uniqso.com/  Recordar que con el código "LVEC" tenéis un 10% de rebaja en esa tienda por la cara).

This is a super quick entry (I know that is sooo weird in my entries XDD)
This weekend i do a nail art so cute about disney princess, they are medium difficult (because you have to use a brush) but they aren´t so difficult that you can´t do that. So, i wasn´t sure if you would like to know how to do them and i forgot to do photos meanwhile i was doing them so.... -_-U

If you want them and you want the tutorial please feel free to ask me for it!! =^^=

This weekend was SO DAMN HOT in Seville like hell, when i went out i wore for the first time a new cute dress i bought last month, i put a colourfull make up and my turquoise lenses from UNIQSO (remember that if you buy in that web you can put the code "LVEC" and get 10% free).

Bueno, pues os dejo las fotos y me decís qué os parece =^^=
Y nos leemos pronto!

Ok, so here they are the photos, if you like them please tell me and if you want the tutorial too =^^=
Read you soon!!


jueves, 6 de junio de 2013

Geek Nails! Zoooombiiiiiesss!!!


Hola a todos!! Bienvenidos una vez más a nuestra vida friki! Soy Hiromi =^^=

En esta ocasión les traigo otro tutorial muy sencillito de cómo hacer unas uñas frikis y muy monas de temática zombie =^^=
Son muy resultonas y vais a ver que en realidad es bien sencillo, así que no dudéis en probarlas =^^=
Estoy preparando el tutorial complementario a este que será de "Plantas contra Zombies" pero mientras lo hago os dejo con cómo hacer a estos zombies.


Hi everyone!! Welcome to our geek life one more time! This is Hiromi =^^=

This time I am here to do a easy geek nail art tutorial about zombies! They are easy and cute ^^
You acn try when you want to because you won´t have to work in them a lot, so when you want i want to see your try =^^=
I am preparing a tutorial about "Plants vs Zombies" but for  now you can see this =^^=


TUTORIAL.- GEEK NAILS: ZOMBIES


Paso 1º. Necesitaremos estos colores y el marbelizador como siempre o un palillo.

Step 1: We need those colours and the marblelizing pen or a toothpick

Paso 2º: Pintamos todas las uñas de verde.

Step 2º: Paint your nails in green.


Paso 3º: Con la pintura roja ahora haremos la sangre en dos de los cinco dedos de una mano. Para que el diseño tengo más variedad y no sean sólo caras de zombies.

Step 3: With the red colour we will do the form of the blood in 2 of our 5 nails, because we want to have more draws than five zombie faces.

**Para hacerlo usaremos el marblelizador, sólo tenéis que mojar la punta y hacer el diseño que queráis, como la sangre no es uniforme es muy sencillo.
**We will use the marblelizing pen to do that, the blood haven´t any specific form so it is easy to do it.


Paso 4º: Con el blanco haremos los ojos de los zombies, quedan mejor si los hacéis ahuevados y no con la misma forma, así que no os preocupéis si os torcéis o lo que sea =^^=

Step 4: With the white one we are going to do the eyes of the zombies, don´t do them simnilar to each other, they are better if you do with irregulars form.


Paso 5º: usaremos el negro para terminar los ojos y para hacer las bocas.

Step 5º: we are going to use the black colour to finish the eyes and do the mouths


Por último volveremos a usar el rojo para darle a nuestros zombies un toque más sangriento en la mirada y en sus bocas :O
Ah! Y por supuesto no olvidéis si queréis que os duren más usar el brillo secante al final!!

The last step is that we are going to use again the red one to do a zombies with more blood in their eyes and mouths
Amd don´t forget to use the lucid polish to keep your polish more time!!


Espero que os haya gustado!!! Nos leemos pronto!!

I wish you like them!! Read you soon!!