Mostrando entradas con la etiqueta Make up. Mostrar todas las entradas

domingo, 1 de junio de 2014

Make up tutorial: Sin cejas! Without eyebrown!

Hola  a todos al habla Hiromi =^^=
Si, sé que haces eones que no escribo, pienso enmendarme en cuanto las opos me dejen, pero eso es otro tema a tratar, hoy vengo a traeros un tutorial express super interesante!!!


Hi everybody this is Hiromi =^^=
Yes, i know it been a very long time since i write here, it is all because of my competition exam, i will re-do this mistake but now i am not here to talk about that, i am going to show you a cool tutorial!


TUTORIAL:  SIN CEJAS
WITHOUT EYEBROWNS

**Este tutorial es especialmente útil para redibujar las cejas del personaje en cuestión que necesitamos o para acortarlas.

*This tutorial is very useful when you want to re-draw your eyebrowns because the character has it different from yours or want to do them shorter.

Hola a todos, soy Hiromi, un domingo por la tarde, sin nah mejor que hacer, sin maquillar ni nah XD Vamos a ello!

Hi everyone! This is Hiromi, a lazy sunday without nothing to do better and without any make up or anything so... here we go to do this tutorial!

Vamos a quitarnos una ceja si y otra no para que veáis la diferencia.

We are going to do this tutorial in only one eyebrown so you can see the difference

Necesitaremos una pastilla de jabón de toda la vida y esta brocha, la que se parece a las brochas de los rimel.

We only need a bar of soap and this make up brush which is like the one in the rimmel

 Mojamos la pastilla de jabón

Put some water

 Frotamos la brocha en la pastilla, haciendo que el jabón se quede en esta, hasta que esté blanquecina y llena de jabón.

Rub the brush with the soap, you have to put all the bar you can in it.


Una vez tengáis jabón lo aplicáis en las cejas en el sentido del crecimiento del pelo hasta que estas queden totalmente lisas y pegadas a vuestra piel. Poner todo el jabón que queráis hasta que tengáis controladas vuestras cejas, a más pobladas más jabón necesitaréis.

Once you got the soap you have to put it with the brush in your eyebrows in the direction of hair growth until they are completely smooth and stuck to your skin. Put all the soap you need until you have checked your eyebrows, you will need more if you have more hair of course.

Usaremos polvos para secar y dar la base al maquillaje, si, los polvos primeros.

We will use face powder the first to do the base for the make up


Presionar, no deslicéis.

Press, not slide

Aquí me he puesto mucho para que lo veáis mejor, pero darle toquecitos hasta que se difumine.

Here i put a lot so you can see it clearly, but you only have to put all you need


Luego usaremos una base de maquillaje de nuestro color de piel.

Then use your regular foundation.


Poneros el maquillaje, dejando que se vaya secando poco a poco hasta que veáis que el color de vuestra ceja va desapareciendo.
Para ello alternar los polvos con el maquillaje líquido. Depende del color de vuestras cejas y el grosor necesitaréis repetir más o menos veces esta operación.

Put the make up leting them dry in your skin and alternate with the face powder, do this operation all the times you need until your eyebrowns don´t stand out.
You will have to do this more than one or two times, it depends of the color of your eyebrown and the hair you have.


Os quedará así. Y ya estáis listo para redibujar vuestra ceja!!
(Ay Dios.... que sustito da jajajajaja)

It will be like that so now you can re-do the eyebown with the form of the character needs
(OMG.... it´s a bit... xD)


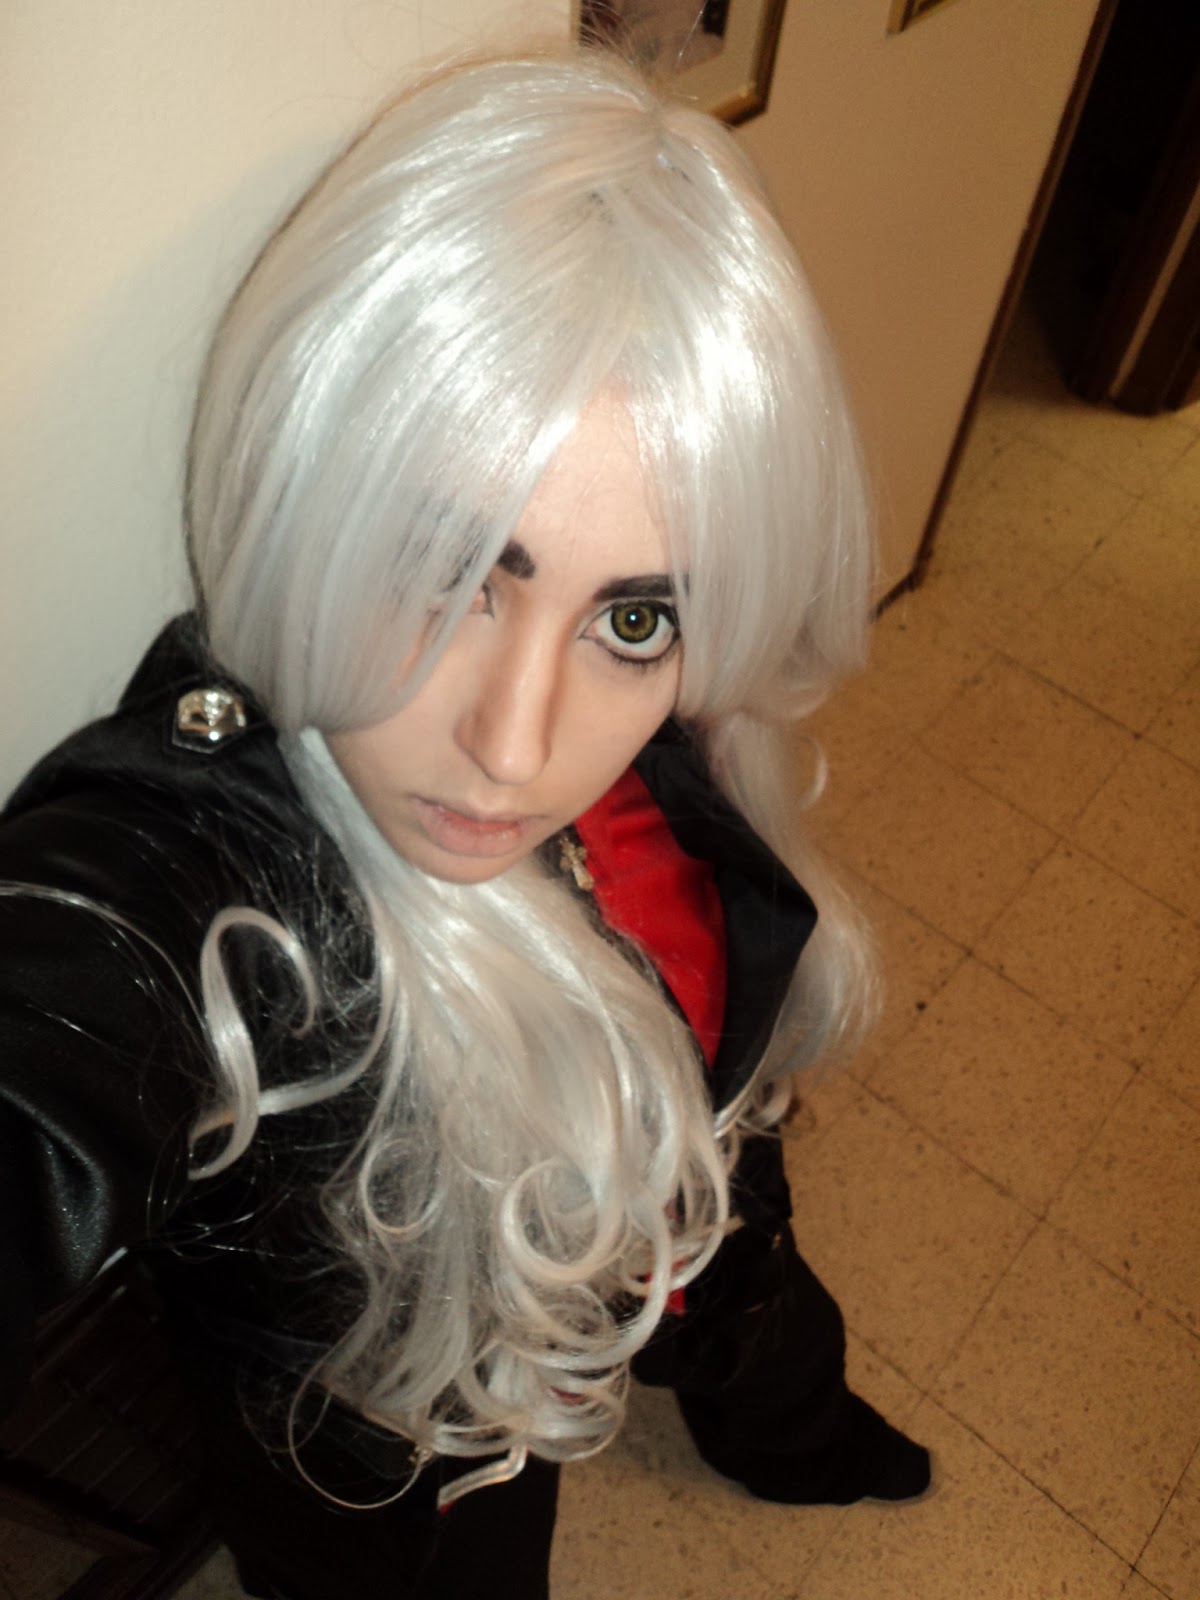
Yo esto lo he aprendido para hacerme las cejas levantadas de Olivia Armstrong, en esta foto se ve una raya negra debido a que ella, en la línea natural de una curvatura de ceja lleva una rayita negra. En esa imagen aún no había depurado el tutorial, pero creo que aún así es digno. Como podéis ver con lo que os he enseñado, ya mejor, no se trata tando de NO dejarte ceja sino de darte una buena base para redibujarla.


I've learned this tip when i did the make up test of Oliver Armstrong, in this picture you can see a black stripe in my natural eyebrowns, that is because the character has one because of the super curved eyebrown she has. It is tru that when i did the test i didn´t know so well the tip i am now showing you but i think it is a good try too. As you can see this tutorial is not for  don´t have eyebrowns, it is for redraw it.

Espero que os sirva!!! Nos leemos pronto!!!

I wish it will help you!! Read you soon!!

miércoles, 13 de noviembre de 2013

Don´t be a panda!


Hola a todos!! Les habla Hiromi una vez más en un blogpost dedicado a la belleza geek ^.-
Este post lo tenía algo retrasado, lo siento Mila T^T pero por fin os lo traigo... se trata de... cómo camuflar tus ojeras!! Si, dejemos de ser un panda jejeje ^.-

Hi everybody!! This is Hiromi one more time to talk about geek beauty ^.-
This blogspot it was a bit delay.... so i am so sorry to Mila who was the girl who ask me to talk about ut -_-U In this time i am going to talk about how not to be a panda, i mean, how to concealer your rings hehe


GEEK BEAUTY:OJERAS
RINGS


¿Quién es la persona afortunada que no tiene ojeras? porque yo NO.

Lo primero que tenemos que saber es que las ojeras pueden ser causadas por una serie de factores que no sólo son genéticas.
¿Qué cosas nos pueden acentuar las ojeras?
- Estar resfriados: pues al sonarnos mucho hace que los vasos dilatadores de debajo de los ojos sufran.
- Cuando dormimos poco.
- Cuando, al tener alergia ocular nos frotamos los ojo.
-Cuando tenemos deficiencia de hierro en nuestro organismo (sobretodo ya sabemos en que fechas del mes somos más propensas a eso): se recomienda comer comidas con mucho hierro como ternera, patatas, tomates, rúcula...

Pero puede que hayamos tenido cuidado con todo esto y aún así estemos ojerosos, así que es el momento adecuado para hablar de correctores de ojeras y cuál es el que necesitamos!!

Allá vamos!!


Who is the lucky person who does not have dark circles? because I DO NOT.

The first thing to know is that dark circles can be caused by a number of factors that aren´t always genetic.
What things can accentuate our dark circles?
- To have a cold
- When we don´t sleepa lot
- When we are having ocular allergy and we rub our eye.
-When we have iron deficiency in our body (especially in those days in the month you know), at this time is recommended to eat foods high in iron such as beef, potatoes, tomatoes, arugula ...

But we may have been careful with all this and yet we have them, so it's the right time to talk about concealers and what we need!

Go!!


Para empezar, la piel bajo el ojo es mucho más fina que la del resto de la cara (de 3 a 5 mm), por lo tanto el producto que tenemos que usar debe ser líquido y fluido, menos espeso y que nos permita extenderlo con facilidad y cuidado para no dañar nuestra piel.

Lo siguiente que tenemos que tener en cuenta es que hay que escoger de color de corrector al menos dos tonos más claro que el color de nuestra base de maquillaje, para que quede bien difuminado cuando la apliquemos encima y no cause un oscurecimiento de la zona.


The first thing we have to know is that the skin under the eye is much thinner than the rest of the face (of 3-5 mm), so the product we have to use should be liquid and fluid and allow us to extend easily with care so we don´t damage our skin.

The next thing we have to keep in mind is that you have to choose a concealer with a color at least two shades lighter than the color of our foundation,  so when we apply the foundation don´t dark that area.


Ahora bien... ¿De qué color debo usar mi corrector?

Pues si, es una pregunta que no sé si os la habéis hecho alguna vez pero que es MUY importante, pues depende de qué color de ojeras tengáis para que un corrector os vaya bien o no.
¿Sorprendidas? La verdad es que yo la primera vez que lo supe me sorprendió porque pensaba que sólo había un color de corrector jajajaja

Como digo es muy importante que el color del corrector sea el adecuado así que os explicaré cuál debéis de elegir:

1. Los correctores de color beige son como "el corrector universal" pues lo que hace es unificar el color de la piel y darle luminosidad.

2. Si vuestras ojeras son rojizas o tenéis alguna rojez en la piel el corrector adecuado es el de color verde, también sirven para ocultar espinillas y pequeñas cicatrices.

3. Los correctores azulados son los que sirven para igualar todo tipo de pieles oscuras.

4. El rosa proporciona resplandor sobretodo si tu piel es opaca, sirve de iluminador además para las pieles blancas.

5. El color malva sirve para eliminar los síntomas de cansancio en nuestra cara y nuestras ojeras. Son de igual modo perfectas para las pieles asiáticas y aceitunadas pues cubre manchas o zonas amarillentas

6. Las ojeras moradas el mejor tipo de corrector es el amarillento, al igual que si no has dormido bien y quieres estar lista en poco tiempo.

7. Si tu piel es muy blanca y hace que se te noten las venas azuladas de una manera notoria, entonces el color que buscas es el naranja.

8. El color blanco es iluminador, pero también sirve para tapar las rojeces, aunque no recomiendo pasarse con él pues ilumina de manera muy fuerte y puede causar un efecto contrario al que queremos de disimular la zona específica.


Otras notas que hay que saber:

Hay que tener en cuenta que un corrector de color claro dará volumen a la zona en la que se aplica, por ello si tenéis bolsas hinchadas no conviene usar este tipo de correctores, sino otros más oscuros que dan sensación de hundir la piel.

Cuando tengamos pocas ojeras, y oscuras,  bastará con un corrector dos tonos más claro que nuestra piel o base de maquillaje, pues aportará la suficiente luz.


Now ... What color should I use?
So yeah, THAT is the right question I do not know if you have made it once, but it is VERY important, it depends on what color you may have in your dark circles that you will need a concealer or another.
Surprised?? The truth is that the first time I knew that it was more than one type of concealer i was LOL

As I say it is very important that the color of the concealer is the right to your skin so I will explain what you must choose:

1. The beige color concealer are like " the universal concealer " because what it does is unify the color of the skin and give light.

2. If your dark circles are red or have some redness in the skin the right concealer color is green, also conceal pimples and small scars .

3. Blue correctors are used to match all kinds of dark skin.

4. The pink concealer provides your skin light and it is perfect for white skins .

5 The purple color serves to eliminate the symptoms of fatigue in our face and our circles . They are just as perfect for Asian skin and it covers olive- yellowish spots or areas

6. For the purple circles the best type of concealer is yellow  and if you did not sleep well and want to be ready in no time this is your concealer too.

7. If your skin is very white and makes you notice the bluish veins, then the color you want is orange.

8. White is illuminating, but also serves to cover the redness , but not overdo with it, because the light it gives you is very strong so it could give you the opposite effect that we want to hide the specific area .


Other notes you need to know :

Keep in mind that a light-colored concealer will give volume to the area in which it is applied , so if you have puffy bags should not use this type of correction , try with a darker color to do the opposite.

When we have a lil dark circles, and not too dark, you can simply use a concealer two shades lighter than your skin or foundation, as it will provide enough light .


Espero que os haya gustado esta entrada y os haya servido, como siempre, si tenéis dudas no os las calléis!!! Y si tenéis algún tema del que queráis que hable... ¡¡para mi es un placer ayudar!!! =^^=
Nos leemos pronto!!!


I wish you like this entry and it will help you in the future, if you have any doubt or you want to comment something please do it!! I am here to help and i like to do it, so... =^^=
Read you soon!!


lunes, 27 de mayo de 2013

Rosiel. Make up test 2

Hola a todos!!! Les habla Hiromi =^^=

Hi everyone!! This is Hiromi =^^=

Mi primer crossplay me está dando mucha guerra, como ya os conté, pero creo que lentamente lo voy dominando. En esta ocasión os traigo el segundo make up test, bastante mejorado del primero.

Aún tengo que mejorar las cejas y parte de los ojos, además de practicar la expresión pero... creo que estoy muy cerca de poder "violetear" a gusto a mi hermanita jujuju encarnada en mi alocada alma gemela cosplayer Dessy jujuju

Ya del traje me queda muy poco, pero estoy de un perezoso que no me salva nadie XD
Tengo que retocar los ojales de la camisa, porque yo he sido muy lista y le he cambiado los botones, y ahora estos son más pequeños y se me quitan solos XDD
También tengo que hacer la gorra, o si puedo compraré una y la tunearé a mi gusto. La gorra es opcional pero yo quiero una >///<.
También tengo que comprar el látigo (porque hacerlo me va a salir más caro).
Y por último me ha surgido un problema con los pantalones que encontré por casa para hacerme este cosplay. Y es que a saber de qué año son porque no me entran XDD Primero voy a ver si puedo sacarles algo, sino buscaré otros negros simples de pinza o pediré prestado XD Porque la verdad no me merece demasiado la pena hacerme unos pantalones.... Bueno, puede que lo merezca pero es que estoy MUY vaga XDD

Espero que esta "vaguitis" se me pase pronto porque quiero hacer este verano el sencillito traje de Elika del Principe de Persia 4 para acompañar a Eaadim en la sesión de fotos del Príncipe.... A ver qué sale de todo esto jajaja

Y sin más demora os voy a dejar con algunas de las fotos de mi nuevo test.


My first crossplay is hardest than i never thought. I really had a lot of problems with my face, trying to look like a not so manly man but i think i am better now. So this time i want to show you my new skills with Rosiel make up.

I have to improve some part of the make up but you can see more less the character now, a mix of female and male character, so bishounen. I have to improve my facial expresions too, because i am not used to pose like a man haha So i think in a few i could be the sexy and strange angel and do a cool photoshoot with my cosplayer-my-other-soul partner Dessy huhu

The costume is almost ready but i have to re-touch some parts and do some mores.
For example, i have to re-touch the botton part of the shirt, i have to do the cap, because i want one of that, i know that the cosplay may can not have it but i want one XD
Another thing i have to do is buy a wip, i was investigating and it is much more expensive to do a wip that buy it, so i will buy one.
Aaaand i have a problem with the pants. I searched in my house for some pants i could use and i found one but i thinki that pants were sooooo old that nobody un my house can put them on hahahahaha so i have to do it, or search for others or... i don´t know, something haha

I am soooooo lazy this time with the cosplay hahaha and i have to make my mind and be less lazy because this summer i wanted to do the cosplay of Elika, to be in the photoshoot with Eaadim of Prince of persia so.... i have to work harder!! XD

And now I´ll show you the new test!


Nos leemos pronto!!!

Read you soon!!

domingo, 31 de marzo de 2013

Tutorial: Baiken Make up

Hola a todos!! Aquí Hiromi en un blogpost más para traerles esta vez un tutorial de maquillaje =^^=

Hiiiiii!!! This is Hiromi!! Thanks for read us and welcome again!! In this blogspost I´ll do a tutorial of make up and i wish you´ll like it!!

Uno de mis videojuegos de lucha preferido es el Guilty Gear, por eso tengo ya dos cosplays de este, y uno de mis personajes favoritos  sin lugar a duda es Baiken. Así que en esta ocasión os traigo el tutorial para que veáis cómo hay que pintarse para su caracterización.

One of my favourite fight games is Guilty Gear, i have 2 cosplays of this videogame for that reason, and one of my favourite character is Baiken. She is sooooo cool so i want to show you my tutorial of how to do her make up.

Tienes muchos pasitos, es algo laborioso peeero no es complicado, os lo aseguro!!
Así que.... vamos allá!!!

It is easy but you have to do a lot of lil things, but you will like the result!!
So... here we go!

Maquillaje para BaikenBaiken´s make up


Primero vamos a hablar de qué nos va a hacer falta para maquillarnos así!
- Crema hidratante o vuestra BB cream.
-          Base de maquillaje
      Corrector
-          Polvos traslúcidos
-          Sombras de ojos en tonos tierras.
-          Látex liquido
-          Maquillaje color rosa para las pinturas que lleva el personaje en cuestión

First of all i´m going to tell ya what do you need to do this make up, ok?
- Your BBcream or cream to hydrate your skin first.
-Make up Base and the concealer.
- Make up Powders
-Eye shadows in brown colours.
- Liquid Latex (for the scar)
-Red and Pink paint for skin.

IMPORTANTE: Si llevas lentillas, siempre se ponen antes. Os lo recuerdo, en el caso de este personaje lleva, así que hay que empezar por ahí tras aplicaros la cremita hidratante o BB cream.

IMPORTANT: if you wear circle lenses remember to put them in the beggining of the make up, not when you are done!!

Este tutorial se hizo a las 8 de la mañana, antes de una sesión de fotos, así que obviar mi cara de sueño jajajaja

This tutorial were done at 8:00 am so don´t think too much about my face hahahaha I was sooo sleepy at that hour XD


PASO 1º BB Cream, base de maquillaje y corrector
SPET 1: BB cream, make up base and concealer.
** ¿Véis que cara de sueño horrorosa? Veréis como mejoro XD
**Now you can see my terrorific sleepy face XD but I´ll re-do it XD


**Hiromi piensa: Dentro de poco seré hermosa buajajaja XD (obviar mis tonterias)
**Hiromi thoughts: I´ll be beautiful bwhahahaha XD


2º PASO: lentillas!
STEP 2; circle lens!

                        
** Baiken tiene un ojo ciego y otro de color rojo, así que para el ciego usé una lentilla blanca.
**The blind eye of Baiken i did thanks to a white lens.

**Ohhh que miedo!! Los ojos dispares de Baiken son muy chulos =^^= El ojo blanco ciego da mucho respeto ^o^
** Ohhhh! scaaaryyy! Baiken has strange eyes but they are cool! The white and blind one is the scariest one! ^o^


3º PASO: una vez solucionada "la mala cara" (XD) vamos a hacer la cicatriz con latex líquido. Se pone una capa de este y con unas pinzas una vez que esté seco se tira un poco para hacer la rugosidad que sale hacia fuera como si fuera la piel

STEP 3. Now you can see a better face of me haha Now we are going to do the scar thanks to the liquid latex. It is easy to do, you only have to put in the part you want and then when it will be dry with a tweezer you can do the correct form. 


4º PASO Mientras se seca el latez podemos ir pintándonos las cejas debido a que Baiken es "pelirosa natural". Cogemos una barra de pegamento en barra y lo pasamos por encima de la ceja, luego ponemos un poco de base de maquillaje y por encima lo pintamos de rosa.

STEP 4: meanwhile the latex is drying we can begin painting our eyebrows in pink. Remember that Baiken is a "natural pink haired" Xd so we have to paint them hehe you can do with the pink paint for the skin easily.


5º PASO: una vez que el látex liquido esta seco y hemos usado la pinza para hacer el relieve, maquillamos la cicatriz con base de maquillaje y usamos polvos sueltos para afianzar y unificar todo el maquillaje.
Y maquillamos nuestros ojos con sombras marrones. En el lagrimal más claro (un amarrillito claro o blanco), en el párpado móvil un marrón clarito y en la cuenca más oscuro para dar profundidad sin que se vea realmente recargado, buscamos un look "natural"

STEP 5: when the latex is dry you can use the tweezer with calm and do the reliefs pulling the latex with care. Then  you can use the make up base in it like in the rest of your skin and the powders.
Baiken "has no make up" so when you do her make up you have to do with care and with colours you canñt see them well, so the eye shadow have to be in brown colours. The light one near to the eye corner and the darker one in the eyelid.


6º PASO: es hora de pintar las cicatrices y los símbolos que tiene Baiken!!
Yo he usado no sólo el rosa que tiene, sino que lo he bordeado con un rojo para darle un toque más visual y llamativo.

STEP 6 Baiken has strange symbols in her face, so now it is the time to do them-
I use the pink one to do them and a red colour to put in the scar in the symbol to emphasis the edges.


7º PASO: Pestañas postizas!! Arriba grandes y largas para que se noten con la peluca y abajo unas pequeñas sólo para matizar la forma del ojo si es lo que quieres (las de abajo son opcionales)

STEP 7: False lashes!!! You can use lower lashes if you want to create a more expresive eyes. i recomend them because with the wig your real lashes don´t stand too much, so it is a good option!


Y ya estamos listo para ponernos la peluca!!! Listo!!! Somos una Baiken

And... we are ready to go out!! We are Baiken now!!


Bueno!!! ¿Qué os ha parecido??? Espero que os haya gustado!!! Nos leemos pronto!!
So... what do you think??? I wish you like it!!! Read you soon!!!


Fotógrafo de esta maravillosa foto =^^= mi querido Nexus
My dearest nexus dod this great pic =^^=
http://nexus6fotografia.deviantart.com/
http://500px.com/nexus6/
http://www.flickr.com/photos/nexus_6/

viernes, 25 de enero de 2013

Ulzzang nerd

Hola a todos!! Les habla Hiromi en una entrada más =^^=

Hi all!! This is Hiromi one more time! =^^=

Esta va a ser una entrada un poco fuera de lo común (y muy chorra, por qué no decirlo jaja) , pero creo que interesante en su propio sentido =^^=
El título es un poco extraño también ¿verdad?
Bueno, de qué va esto... Pues es muy simple, la verdad es que desde hace tiempo me muevo por tribus urbanas, sobretodo de ascendencia asiática, buscando dónde sentirme cómoda a la hora de vestirme y salir a la calle y hasta hace poco no había caído en algo. Y eso es que para mi vestirme es como hacer cosplay, como no me siento "nada en particular" (es decir: ni gyaru, ni ulzzang, ni visual kei, ni gótica, ni emo...) me siento a la vez de todas esas formas y mucho más. Cuando elijo la ropa o la compro pienso en los estados de ánimo que tengo en ese momento, en los tipos de vestir que me gusta y compro un poco de todo, me gusta variar y me gusta hacerlo muy a menudo.

This entry will be a bit unusual (and very nonsense, why not haha), but I think it's interesting in its own sense = ^ ^ =
The title is a bit weird too right?
Well, what this is ... Well it is very simple, the truth is that for a long time I move through urban fashion tribes, especially of asians, looking for a place to feel comfortable when I dressed and go out and until recently I had not fallen into something in special. And that's ´cause to me to dress is like to do cosplay, so i could be gyaru, ulzzang, emo, goth... and i could be nothing of all of that. When I choose to buy clothes or think what to pick i always think about my dayly mood so i have a lot of different kinds of clothes and i like to wear a lot of types!


Y en esas estamos, que diga, estoy ^^U en cambiar. Últimamente me he dado cuenta que cuando salgo entre semana cada vez me da más pereza arreglarme pero siempre una quiere cuidarse así que he descubierto mi última forma de vestirme que es.... ulzzang nerd!!

And in these kind of days i am now hehe ^ ^ U Changing. Lately I've noticed that when I go out during the week I get more and more lazy to dress me up but i don´t want to be soooo lazy so...  I found my new way to dress me!!.... ulzzang nerd! ¿?? wtf XD

Siiii, se trata de usar la forma ulzzang de maquillaje, suave, sutil, natural, con mi forma más nerd de vestir, además ayuda bastante las gafas nuevas que tengo jaja

Ulzzang nerd? Whatñs that? Yeahhhh, it comes to using the way of ulzzang makeup (soft and natural) with my nerdy way of dressing (and also helps a lot that I have new glasses haha)

¿Y sabéis que? que me encanta jajaja Porque nunca he negado ser friki y tampoco he negado que soy una chica estudiosa (que no empollona aunque siempre me lo han dicho :S) y me gusta cuidarme así que como he dicho he encontrado otra forma perfecta de vestirme (o disfrazarme) para salir a la calle, cómoda pero con personalidad =^^=

And you know what? I REALLY love it!! hahaha  Because I've never denied being geek and I've never denied that I am a studious girl (not nerd although I always have said that :S) and I like to take care of details so as I said I found another perfect way to dress (or disguise) to go outside, comfortable but with personality = ^ ^ =

Bueno, y tras todas estas tonterías os dejo con las fotos de mi nuevo outfit XD
En breve nueva entrada sobre cómo llevamos el cosplay, una entrada con el repujado de la garra del Príncipe, muy interesante, pero hasta entonces os dejo con esta tontería XDD
Nos leemos pronto!

Well, after all this nonsense I leave you with pictures of my new outfit XD
New post shortly on how we are doing our cosplay, an entry with embossing Prince's claw, very interesting, but until then I leave you with this nonsense XDD
Read  you soon!


jueves, 4 de octubre de 2012

Tutorial: Seras Victoria (Hellsing)

¡¡Buenas!! Aquí Hiromi en este mi primer blog post en el que os voy a enseñar mi tutorial de cómo maquillarse para hacer del personaje de la serie de Hellsing, Seras Victoria, en su faceta más cute!!
Lo primero que tengo que decir es que elegí hacerme el cosplay de Seras porque me parece un personaje genial e increiblemente adorable, pero no sé porqué todas las cosplayers que veía la retrataban en su parte más psyco, y me dije... ¿Por qué no enseñar que Seras es un personaje de lo más achuchable del mundo??
¡¡Y es que es verdad!! Cualquiera que vea la serie debería saber que, aunque cuando pelea se pone muy seria la mayoría del tiempo es una monada!! Si hasta dan ganas de fastidiarla para verle la cara de compungida!!! jijiji
Y con esto en mente comencé a hacerme su cosplay y a practicar con su maquillaje, así que, allá vamos!!!


Hi! This is Hiromi, in my first real blog post in which I´ll teach you how to do a cute make up for the character Seras Victoria of Hellsing!!!
Firstly I want to say that when i began to think to do a cosplay of Seras I thought that I wanna do a cute one, because I don´t know why but other cosplayers only make her like the psyco she is when she fihts haha
Buuuut all the time she isn´t fighting she is really adorable!! So I wanna do that part of her!!
So, here´s the tutorial about the make up I´ll use when I´ll do her photoshoot. I wish you like it!!!

Para comenzar lo primero que quiero pedir es perdón por la mala iluminación, no sólo lo hice tarde sino que me faltaba luz en la habitación ^^U Pero salvo eso creo que se ve bien...
Y era verano, así que hacía un calor insoportable... -_- no volveré a hacer un tutorial tan a la ligera, pero es que en realidad no me lo pensé demasiado XDD

So, first of all I want to say sorry for the bad ilumintation in the photos, the day was ending and in my room there weren´t a lot of lights.... and it was summer so It was super hot... -_-u
I promise I´ll do betters tutorials but for now... this is the only I have ^^U


1) Para empezar prepararemos nuestra piel con una base premaquillaje, yo suelo usar BBCream de Skin79, la rosa, debido a que tengo la piel mixta y luego nos pondremos las lentillas (en esta foto no se ve demasiado la lentilla pero luego ya se verá mejor en otras fotos)
Una vez puestas ya podemos comenzar aplicando la base de maquillaje.

1) First of all you have to put your make up pre-base, I usually use the BBCream of Skin79 (the pink one) and then put the lens. (In this photos you can´t see so well the lens but in others you´ll can)
So when you have them you can out the make up base.


2) A continuación usa el corrector que necesites y trata de igualar y aclarar el tono de piel todo lo que puedas, después de todo Seras está muerta jeje No es que tenga un color de piel muy oscuro! XD
Y a continuación usa coloretes, pero como estamos haciendo una versión muy kawaii usa coloretes de color rosa bebé.

2) Then, use all the eye corrector you need, remember that you are trying to have the palest skin you can, ´cause Seras has a pale skin ´cause... she is dead XD
We are trying to do a kawaii Seras so the blush you have to use is in a baby pink tone, much more cute like that!


3) Como colores de sombras de ojos vamos a usar tres, uno muy claro amarillento o blanco para la zona del lagrimar y un poco del párpado móvil. Marrón claro para la zona del parpado móvil exterior y delimitaremos la mirada con una sombra marrón oscura difuminada en la línea del pliegue del párpado.

3) The colors of shades of eyes we are going to use are three, one yellowish or white very clear, this is for the zone of the lagrimar and a bit of the mobile eyelid. Light brown for the zone of the mobile exterior eyelid and we will delimit the look with a dark brown shade faded away into the line of the fold of the eyelid.


4) Perfilamos el ojo con delineador negro pero no hacemos raya, sólo para hacer sombra por el interior del ojo, después de todo no queremos dar un aspecto recargado.
Luego usamos pestañas postizas para matizar el resultado.
La primera vez que hice esta prueba de maquillaje no usé pestañas postizas pero la segunda sí, así que os voy a poner una foto sin pestañas, para que veáis que puede quedar bien, pero que siempre da una imagen mejor con unas buenas pestañas que hagan nuestros ojos más redondos y grandes.
Puedes elegir ponerte pestañas de abajo si lo deseas, yo es que tengo muchas pestañas de abajo, aunque rubias, y cuando uso rimel se notan mucho y no me hacen faltas estas extensiones, pero de todas formas siempre es una buena opción.

4) We line the eye with the black delineator but we do not do a stripe, only to do shade in the interior of the eye, after all we don´t want to give an overloaded aspect. 
Then we use false eyelashes to tint the result. The first time that I did this test of makeup I did not use false eyelashes but the second one yes, so I´m going to put a photo without eyelashes, in order that you can see that it can stay well, but that always it gives a better image with a few good eyelashes that do our eyes more round and big. 
You can choose to put on eyelashes of below if you wish, I have many eyelashes of below, though blondes, and when I use mascara they are obvious so I don´t need them but you can add them because they are a good option.

5) Por último, usa una barrita de labios rosa muy pálida, yo estoy usando la Candy Doll Pink Ramune, que es una preciosidad, con un poco de brillo de labios encima para aderezar, y tener una boca preciosa =^^=

5) Use a lipstick in a pale pink, I´m using the Candy Doll Ramune Pink, it´s so cute and shinny and some lipgloss to do the final result of a lips super cute and tasty ufufu


Ya estás lista para ponerte tu peluca y ser una Seras suuuuper kawaii!!!!
Y para demostrarlo pongo fotos de la segunda prueba de maquillaje que me hice, en la cual aunque no hice fotos para un tutorial si que hice del resultado =^^=

So now you are ready to put the wig on and be the most kawaii Seras ever!!
I´ll put now some photos of the second make up test in which I didn´t do photos of the tutorial of how to make up like her but I did of the result.

Kawaii Seras!!
Aquí se me ve además con el disfraz =^^=
You can see a bit of the cosplay too
Con cara de perrito abandonado... XD
With a sad doggie face... XD

Y la última..... no puedo evitar que me encante poner cara de pez globo!!! jajajajaja
And the last one... I love the face like a globe-fish!!! hahahahaha

Esa cara es porque estoy triste de que la entrada se haya terminado jaja.
Bueno... ¿Qué os ha parecido?
¿Os gusta el resultado??
Trataré de ahora en adelante de hacerme las fotos para tutoriales con más esmero (en aquel tiempo ni tan siquiera sabía que usaría esas fotos para un tutorial XDD), pero espero que aún así os haya gustado =^^=
¡¡Espero vuestros comentarios!!!
Nos leemos pronto!!!


That face is because the blog post ends here.... hahaha
So... What do you think of this blog post? of this tutorial???
In the future I swear to do better photos for the tutorials but in that time I didn´t know I´ll do one with those photos haha
But I wish you like it... =^^=
I´ll wait your comments!!
Read you soon!!